Use a frame for the embroidery. The fabric should not be stretched tightly - it will lead to pluckering of embroidery when the frame is removed. The fabric should not sag within the frame either.
Mastering the Basic Diamond - Foundation
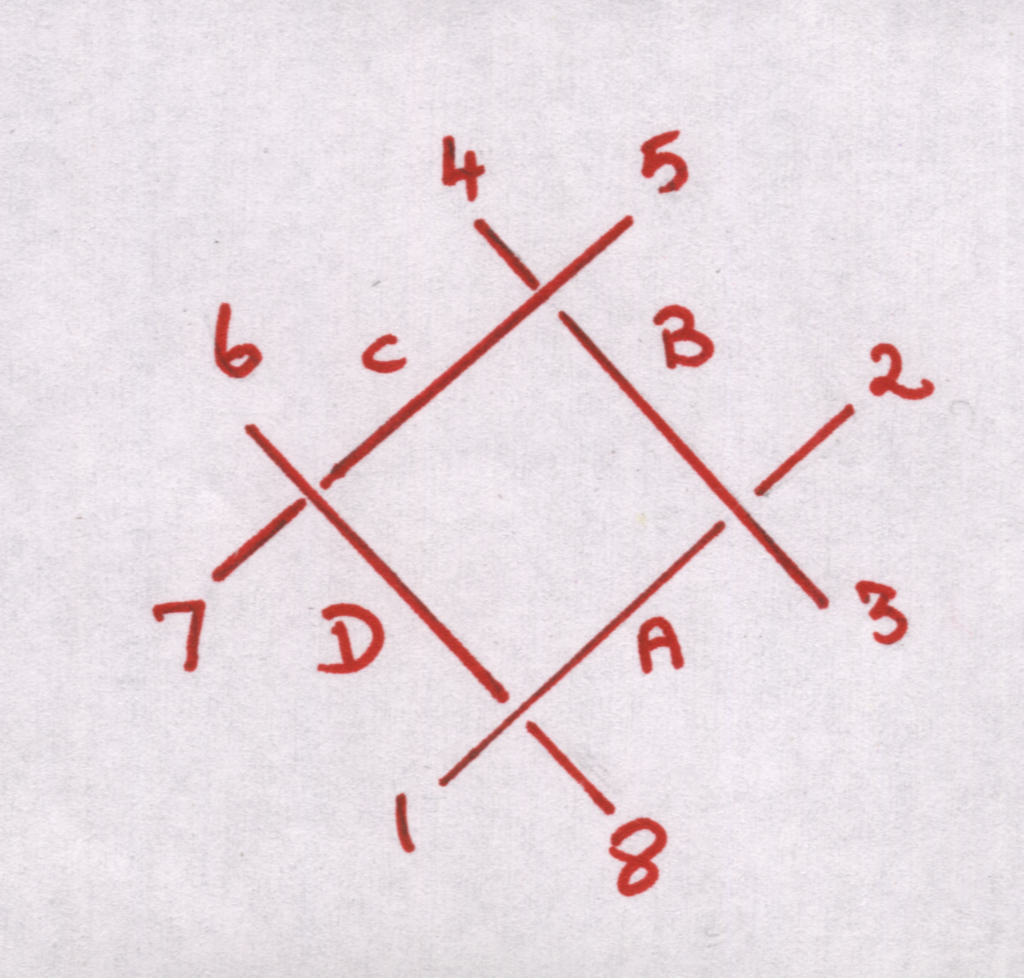
Lines A, B, C and D form the basic square or diamond depending on how it is drawn.

Points 1 and 2 are extensions of the line A at the two ends of line A.
Points 3 and 4 are extensions of the line A at the two ends of line B.
Points 5 and 6 are extensions of the line A at the two ends of line C.
Points 7 and 8 are extensions of the line A at the two ends of line D.
Bring the needle up at 1
Take it down at 2
Bring it up at 3
Take it down at 4

Up at 5
Down at 6
Up at 7
At this point, pass the needle under line A and down at 8.
The skeleton or the foundation for the basic diamond is now complete.

PLEASE NOTE THAT THERE IS AN ERROR IN THE FIG ABOVE - 6 AND 7 SHOULD BE INTERCHANGED Thank you Manjeri for pointing it out.

The pictures show pictorial representation and the Basic Diamondworked on fabric.
Did you notice that…
One end of A is over D and the other under B
One end of B is over A and the other under C
One end of C is over B and the other under D
One end of D is over C and the other under A
Understanding this alternating sequence of overs and unders is the secret behind successful working of Kutchwork.
It is essential to understand and master this concept before proceeding to the next step.
Mastering the Basic Diamond - Foundation
Lines A, B, C and D form the basic square or diamond depending on how it is drawn.

Points 1 and 2 are extensions of the line A at the two ends of line A.
Points 3 and 4 are extensions of the line A at the two ends of line B.
Points 5 and 6 are extensions of the line A at the two ends of line C.
Points 7 and 8 are extensions of the line A at the two ends of line D.
Bring the needle up at 1
Take it down at 2
Bring it up at 3
Take it down at 4

Up at 5
Down at 6
Up at 7
At this point, pass the needle under line A and down at 8.
The skeleton or the foundation for the basic diamond is now complete.
PLEASE NOTE THAT THERE IS AN ERROR IN THE FIG ABOVE - 6 AND 7 SHOULD BE INTERCHANGED Thank you Manjeri for pointing it out.

The pictures show pictorial representation and the Basic Diamondworked on fabric.
Did you notice that…
One end of A is over D and the other under B
One end of B is over A and the other under C
One end of C is over B and the other under D
One end of D is over C and the other under A
Understanding this alternating sequence of overs and unders is the secret behind successful working of Kutchwork.
It is essential to understand and master this concept before proceeding to the next step.
21 comments:
Hi Bhavani,
Great article. You have made it so clear and simple. I could do a few samples using your instructions.
Thank you so much for your broad mindedness in helping others learn.
With Best Wishes
Viji
Hi Bhavani
My mother used to do beautiful Kutch work and promised to teach me since I enjoy doing embroidery.Unfortunately she died before she could.Now almost 12 years later I came across you tutorials and and am so thrilled.I can't wait to get started and eventually complete some of her unfinished work.I'm also excited to add it to my future embroidery projects.
Thank you once again.
Aysha
actually there is a small problem, if you would check the diagram that you have posted as versus the instructions you would realise 7 is where 6 is supposed to be and visi versa..... Please correct the above, but I really love the tutorials, its perfect for a designer like me!
Dear Manjeri,
you are right. Thank you for pointing it out. i will corredt the diagram at the earliest.
Beautiful site , you are doing a great service to lovers of embroidery. Please tell me how to get neat looking rows - do you have to mark all the squares on fabric? Also what is the approximate size of each square or basic diamond?
You'll get neat rows if you use graph paper to draw your patterns on.
The approximate size of the square is about 1/16 the size shown in the first diagram.
Dear Sir,
its great job..u made learning this particular work easy as i m an engineer & dont hv time 2 join d clas. thanx a lot.
Kavita
On each page, please provide a link to the previous and subsequent pages. The first time, I just saw your introductory page and could not find the tutorial since there are no links provided.
Hi Bhavani ,
thank you so much ..thru ur comment i get back this link i was searching since long time..its a grt tutorial ..thanks once again..i have gone thru ur design collections also whr u have mentioned abt ur granny's collection of designs and u r difitising them..pls can u share them
hi bhavani,
this is lakshmi vedagiri. ranju had a project to do in embroidery so i made some motifs. I searched some patterns in the net. I got into ur site. The lessons are so clear and easy for beginners.All the best. -lakshmi
Bhavani,
I found the copy of your tutorial converted to word document and presented to the members on a site.
http://www.indusladies.com/forums/embroidery-works/60254-project-embroidery-compiling-documenting-all.html
Thank you for pointing it out to me.
Human Nature ever so often rears its disgustingly ugly head.
On the flip side there are still a lot of wonderful people out there. Like Gina from Patra's place. She photocopied and sent me a largartera pattern she had just be cause I posted a pattern on my blog - it arrived by snail mail all the way from Austraila. She did not have to do it.
Hi Bhavani,
I went thro' your tutorial and made a dress and I am quite impressed by myself. It is all thanks to you. Can you teach us how to draw patterns using graph.
Great work
shaila
Hi Dear,
I wanted to learn this work for long. But could not found someone to teach me the same. Now, your blog has made it so simple for me. Thanks a lot.Wish you good luck!
NS
Shaila,
if you are familiar with MS office, it is easier to do it with word.
NS,
thank you for your wishes. glad you found the lessons useful.
Hello Bhavani, I was so happy to read your tutorials, especially on Maltese Cross. I've been struggling with this stitch and your instructions are wonderfully clear and helpful. Thank you for all the hard work. I am sorry that someone has stolen your intellectual property. It's unpardonable. Is it all right to copy them into Word for my own use? I don't have a laptop and embroider in a different room to where my computer is.
I hope your day is a good, happy one.
Ann
Hi Ann,
glad you found the lessons helpful. Go ahead and copy it into word.
Have a wonderful day
Hi Bhavani,
I have been studying the various pages on your blogs for two days now and I am so inspired. I very much want to make some things for my house. I have an embroidery machine what will do some of the stitches but there are some that I would like to do on my own. I have also went to the recommended site that gives background information on the cloth. I am going to try this but what I want to ask are two things. 1- what cloth would you recommend a beginner start with? 2- I noticed you referenced your Grandmothers shopping bag many times and I was wondering what that is. Is it really a shopping bag that holds patterns or is it a figure of speech?
Thank you so much for the wonderful information!!
I am waiting for an embroidery frame to come in the mail and I will venture into the world of embroidery soon. I hope like you I discover that I am good at this because I always wanted to do embroidery. I have such grand ideas in my head. (smile) PS I have corrected your sketch for myself and if you would like a copy I can email it to you. Just send me an email to jayaparas1961@gmail.com and I will send it to you.
Hi Jaya,
glad you enjoyed my blogs. Trying to find time to start blogging again.
I suppose I have mentioned the shopping bags in the Huck embroidery page. They used to call this material towelling cloth. It is cotton and the embroidery is done completely on the surface of the fabric. i.e you won't see anything on the reverse but for the beginning and ending knots. I don't know where the material is available these days.
I am sure you'll be good at this.
I am planning to start online classes sometime next September. If you are interested, I will let you know when the classes are ready.
Yes please do notify me. I am very interested. Thank you
PS The first comment it took me about 6 tries to copy the captcha correctly!! I almost gave up. It is a real pain but I really wanted to get my message to you so I continued.
Jaya
www.acitygirlscountrydream.com
PS thank you for the shopping bag explanation
Post a Comment