Mastering the Basic Diamond - the interlacing

The next step is filling or interlacing the foundation or the skeleton.
Note: I will be using the terms filling and interlacing interchangeably. So too the terms foundation and skeleton.
Bring the needle up between 1 and 8 as in the picture.
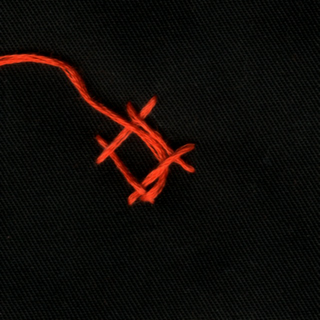
Pass the needle
over 1 and under D
over B and under 2 = Line A1 is formed
over 3 and under A = goes around corner.

Over C and under 4 = Line B1 formed
Over 5 and under B = goes around the next corner.
Over B1
Over D and under 6 = Line C1 is formed
Over 7 and under C = goes around the next corner

Over C1 and under A1
Over A and under 8 = back to the starting point wherein the needle is inserted back into the fabric.
Points to remember:
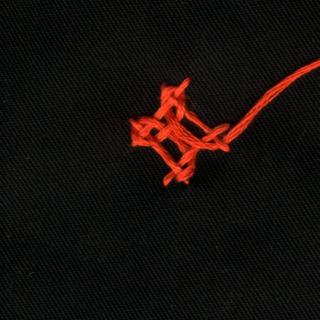
1. Except at the starting point and at the end, the needle is only passed under or over previously laid thread.
2. You can count upto 4 parallel lines in any direction in this motif. Observe that if the odd numbered threads are under line A, then the even numbered threads are over line A and vice versa. The same is true for lines B, C and D also.
This again is a very important step. It should be perfected before moving on to the Maltese Cross.
The next step is filling or interlacing the foundation or the skeleton.
Note: I will be using the terms filling and interlacing interchangeably. So too the terms foundation and skeleton.
Bring the needle up between 1 and 8 as in the picture.
Pass the needle
over 1 and under D
over B and under 2 = Line A1 is formed
over 3 and under A = goes around corner.


Over C and under 4 = Line B1 formed
Over 5 and under B = goes around the next corner.
Over B1
Over D and under 6 = Line C1 is formed
Over 7 and under C = goes around the next corner
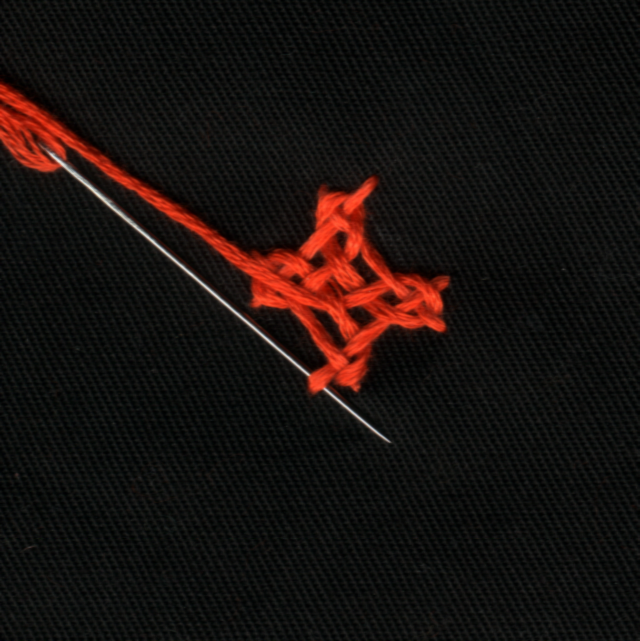
Over C1 and under A1
Over A and under 8 = back to the starting point wherein the needle is inserted back into the fabric.
Points to remember:
1. Except at the starting point and at the end, the needle is only passed under or over previously laid thread.
2. You can count upto 4 parallel lines in any direction in this motif. Observe that if the odd numbered threads are under line A, then the even numbered threads are over line A and vice versa. The same is true for lines B, C and D also.
This again is a very important step. It should be perfected before moving on to the Maltese Cross.
10 comments:
Dear Madam,
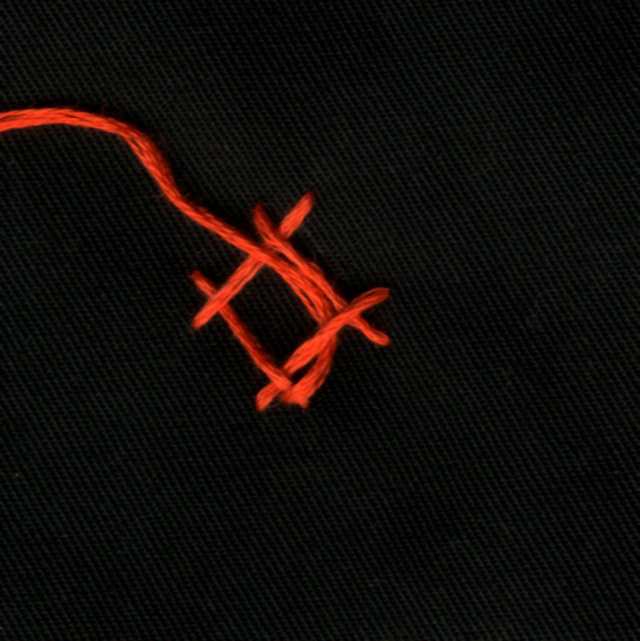
There is a difference between the pictures you have posted in Lesson Part 1 And Part 2.
In part 1, the point 8 is down between row 1-2, whereas the pic in Part 2 is different. I am not able to do the interlace. Kindly clarify.
Dear Vijayalakshmi,
Thank you for pointing it out. At least 2o of my students went through my notes before I finally posted it and none could make this out - probably because they already knew the method.
A lot of readers have also learnt Kutchwork from here - again I suppose they only went throught the diagram.
I'll see what I can do to correct it.
As for your interlacing, position the diamond the same way it is in the picture in Part 2 - the overs and unders should be exactly as it is in the picture.
If you have any further trouble, let me know.
I will make the relevant changes within the week.
Thank you once again.
I used to know how to do sindhi karhai ages ago but since I did not pursue it , I complete forgot how to do the intricate knot. Thanks to your tutorial ,I have regained my forgotten skill.
thanks for the tutorial.i was really waiting for such lessons at home.i hope you will go ahead with the lessons.
Hi
very nice and clear tutorial. thanks for the effort.
Shikha
Dear Ms.Bhavani Haririshnan,
Thanks for this blog! I really appreciate the thoughtfulness in conveying each steps in stitching especially with a detailed photograph! Really great!! Thanks a lot for putting up a wonderful blog like this. It was really helpful.
Best wishes and regards,
Maria Mathews.
can u please put a tutorial on 3 diamond motif...not just a three diamond but a continuous one....i want to do it in a saree...
I have a job now. But let me see what I can do. Maybe if I can spend a a couple of hours during the kind... But first what do you mean by 3 diamond? can you draw a rough sketch and mail it to me at hari.bhavani@gmail.com?
Hi Bhavani,
i'm new to kutch work.i cnt understand the interlacing work.before filling can you please clear the numberings and labels(say A,B,etc...)once again?
Hi anonymous, you'll find the numbering in Lesson 1 Part I. You'll find the link in the side bar.
Post a Comment